Community Builder: Quick Links
Community Builder
The Community Builder allows you to create virtual intranets and extranets based on group membership. The Community Builder enables additional options within your Pages, Events, Resources, Discussions, Store, People and Groups managers that allow you to exercise complete control over content access.
Assign A Person Rights to Edit One Web Page:
Completing the sections below (from top to bottom) will enable one of your Web site users to edit any page that you specify within your Web site.
 Login to your Website Control Panel and click on the Groups icon. The first step you need to take is to create a Group Type. (Note: You will also need to create Schedules if you have not done so already. You will not be able to create a group unless you do this.)
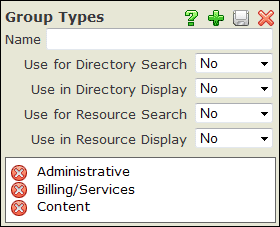
- Click on the tab titled "Group Types".
- NAME: This is the name for the group type you are creating.
- USE FOR DIRECTORY SEARCH: This allows users to search for the groups associated with this group type on your Directory page. (This only applies to those who have the People manager.)
- USE IN DIRECTORY DISPLAY: This displays your groups associated with this group type on your Directory page. The user will be able to choose a group from a drop down list. (This only applies to those who have the People manager.)
- USE FOR RESOURCE SEARCH: This allows users to search for the groups associated with this group type on your Resources page. This also allows users to search for Events associated with your groups on your Events page.
- USE IN RESOURCE DISPLAY: This displays your groups associated with this group type on your Resources page. The user will be able to choose a group from a drop down list.
- Click the Save
 icon within the dialog box to save each Group Type.
- To make changes to the Group Type, click on the appropriate name, make your changes and click the Save
 icon in the upper right corner when you are finished.
- To delete a Group Type, click the Delete
 icon to the left of the name.
 Once you create your Group type, you will click the Add New Group
  icon to add a new group.
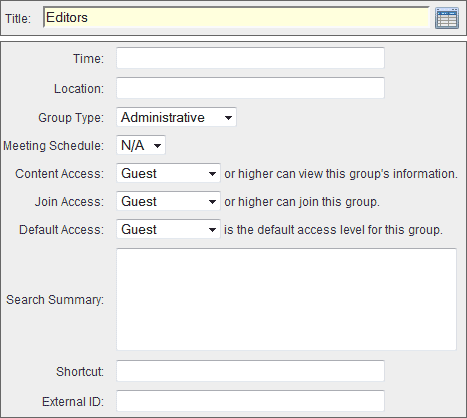
- TITLE: Enter the Group Name. In the example to the right, we are using "Editors" as the name of our group.
- TIME: Enter a time if applicable. If this does not apply, enter N/A.
- LOCATION: Enter a location if applicable. If this does not apply, enter N/A.
- GROUP TYPE: Select the appropriate Group Type for this group. In this example, "Administrative" is the Group Type that we need to select.
- MEETING SCHEDULE: You can leave Meeting Schedule set at the default value selected.
- CONTENT ACCESS: This allows you to set the minimum security level required to view your Group. For more information on setting access, see the People manager.
- JOIN ACCESS: This allows you to select the level of access a user will need to be able to add this group to his or her profile.
- DEFAULT ACCESS: This is the access level a person is automatically assigned when they add this group to their profile regardless of what their site wide access is set to.
- When you are through with the group setup, click the Save
 icon in the upper right corner of the screen.
- Exit the Groups manager and return to your Control Panel.
- Click on the People manager icon.
- If the person in which you are wanting to grant administrative access is already setup in the People manager, locate the person by entering their last name and clicking the Search People button. Or, you can click the Show All People button and then select the corresponding ID number for the user. Once you open the person's record, skip down to number 5 below. If the user is not in your list, proceed to number 3 below.
- If the person is not in your People manager list, click the Add New Person
 icon and enter all necessary data. For detailed information, visit the People Management section within the help manual.
- While creating the person, you will also assign site-wide access. If you want the person to have Member site wide access, select Member from the Site Access drop down menu. This will grant the person access to any area of the site, not constrained to a group, where content access level is set to Member or Guest.
 Click the Group Rights tab.
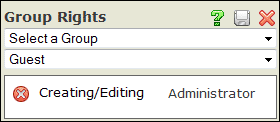
- Choose appropriate group and set security access for that group to Contributor, Editor or Administrator. In the example, we select "Creating/Editing" for the Group and "Administrator" for access level within that group. So, this person has Administrator rights within the Creating/Editing group.
- Click the Save
 icon in the upper right corner of the dialog box and then close the dialog box.
- Exit the People Manager and return to your Website Control Panel.
 Click on the Pages icon.
- Create a new page or open the page you want the person to work on by double clicking the title of the page.
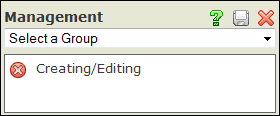
- Click the Management tab.
- Select the appropriate group from the drop down menu.
- Click the Save
 icon in the upper right corner of the dialog box.
By assigning a group to a page, you are granting management rights to the page based on a person's rights within the assigned group. In this example, the person now has Administrator rights for this page and this page only. You will need to send the user to your normal Control Panel Login page and have them enter the Site ID, their Username and their Password assigned to them in the
People manager.
 Login to your Website Control Panel and click on the Groups icon. The first step you need to take is to create a Group Type. (Note: You will also need to create Schedules if you have not done so already. You will not be able to create a group unless you do this.)
 Once you create your Group type, you will click the Add New Group
  Click the Group Rights tab.
 Click on the Pages icon.