Forms
An HTML form is a section of a document containing normal content, markup, special elements called controls (check boxes, radio buttons, select boxes, buttons, etc.), and labels on those controls. Users generally "complete" a form by modifying its controls (entering text, selecting menu items, etc.), before submitting the form to an agent for processing (e.g., to a Web server, to a mail server, etc.). Forms can be used in many ways, such as collecting general information, registration or surveys.
Who has access:
You must have one of the checked permissions to use this manager.
Guest
Member
Contributor
Editor
Administrator
Group Contributor
 Delete the "Under Construction" text and replace it with appropriate text to best meet your form needs.
- Hit the Enter key on your keyboard.
- Click the Create Form icon
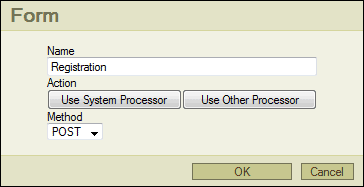
- NAME: Enter your form name. Please do not name your form "Input" as it will not work.
- ACTION: Click the Use System Processor button. A series of prompts will follow. Enter your Site Id in the first prompt. Enter the form recipient email address in the second prompt. Enter the form subject in the last prompt. Click OK after you enter your data in each prompt. Internet Explorer users click HERE if nothing happens when you click the Use System Processor button.
- METHOD: Select POST from the drop down menu.
- Click OK.
- To begin adding controls to your form, click anywhere inside the form's dotted outline and select a control from the editor.
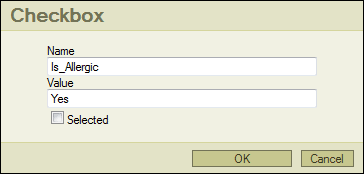
Check boxes are used when you want the user to select one or more options of a limited number of choices. For example, you may want to know if the user has a car, truck or both.
- Enter a question that would require a Check box for an answer. For example: "Is your child allergic to anything?"
- Press the Return key on your keyboard
- Enter a label for the Check box such as "Yes."
- Click the Check box icon.
- NAME: Enter a descriptor for the Check box as this is what appears in the email you receive once the form is submitted. For example: "Allergic". The Field Name cannot include spaces or special characters. You can use underscores to represent spaces. For example: Is_Allergic.
- VALUE: Enter a descriptor for the Check box value as this is what appears after the Field Name in the email you receive once the form is submitted. The value is determined by what Check box the user selects. For example: "Yes"
- SELECTED: Put a check in the box if you want the Check box to default to being selected.
- Click the OK button to continue or the Cancel button if you do not wish to continue adding a Check box to your form.
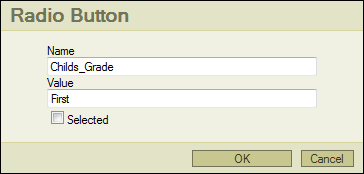
Radio Buttons are used when you want the user to select one of a limited number of choices. For example, you may want to know if the user is male or female.
- Enter a question that would require a Radio Button for an answer. For example: "What grade is your child in?"
- Press the Return key on your keyboard
- Enter a label for the Radio Button such as "1st Grade."
- Click the Radio Button icon.
- NAME: Enter a descriptor for the Radio Button as this is what appears in the email you receive once the form is submitted. For example: "Grade". The Field Name cannot include spaces or special characters and you must give the same Field Name to all created Radio Buttons. You can use underscores to represent spaces. For example: Childs_Grade.
- VALUE: Enter a descriptor for the Radio Button value as this is what appears after the Field Name in the email you receive once the form is submitted. The value is determined by what Radio Button the user selects. For example: "First"
- SELECTED: Put a check in the box if you want the Radio Button to default to being selected.
- Click the OK button to continue or the Cancel button if you do not wish to continue adding a Radio Button to your form.
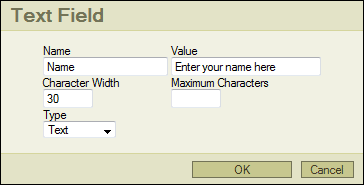
Text fields are used when you want the user to type letters, numbers, etc. in a form. For example, you may want the user to enter his or her first and last name.
- Enter a label for your Text Field such as "Name:".
- Click the Text Field icon.
- NAME: Enter a descriptor for the Input Field as this is what appears in the email you receive once the form is submitted. For example: "Name". The Field Name cannot include spaces or special characters. You can use underscores to represent spaces. For example: First_Name.
- VALUE: You can choose to have the Input Field already filled in with text such as, "Enter your name here." Whatever text is entered in the Input Field by you or the user is what appears after the Field Name in the email you receive once the form is submitted.
- CHARACTER WIDTH: Enter a default size for the Input Field.
- MAXIMUM CHARACTERS: Enter a maximum number of characters that can be entered into the Input Field.
- TYPE: The Input Field can be a Text field in which the field is viewable to the user and the information typed into the field is viewable just as it is entered. The Password field is a field viewable to the user, but the information entered is not.
- Click the OK button to continue or the Cancel button if you do not wish to continue adding a Text Field to your form.
Text Field Name
If you give your text field the name of "Name", you must capitalize this. It cannot be called "name", with a lowercase "n", as the form will not function properly.
Form Copies By Email
While creating a text field, you can input "Copies" as its name, but do not input a value, in order to allow the form submitter to receive a copy of the form by email. Be sure to give the field an external text label which tells the form submitter that if they put their email address in this field, they will receive a copy of the submitted form.
Form Replies
If you want to be able to easily reply to the submitter once you receive the form submission email, you should include a text field in your form which has "Email" as its name, again do not input a value. You may want to
require an answer to this field so that it does not accidentally get ignored during the submission process. This may also prevent some form submissions from being caught or rejected by spam filters.
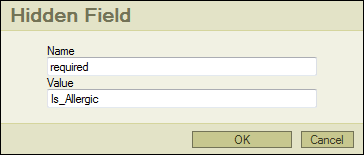
The hidden field is a field that is not viewable to the user, but whose values are submitted with a form. The hidden field control type is generally used to store information between client/server exchanges that would otherwise be lost. This field can be used to define required input or to setup a return url.
Required Field
Fields defined where user input is required. This does not work for check box type fields.
- Click the Hidden Field icon.
- NAME: Enter "required" for the field name.
- VALUE: Enter the field names you want to be required. Place a comma after each field name. There cannot be a space after each comma.
- Click the OK button to continue or the Cancel button if you do not wish to continue adding a Hidden Field to your form.
Return URL
The URL to display once the form has been submitted and processed.
- Click the Hidden Field icon.
- NAME: Enter "returnURL" for the field name.
- VALUE: Enter the URL to display once the form has been submitted and processed.
- Click the OK button to continue or the Cancel button if you do not wish to continue adding a Hidden Field to your form.
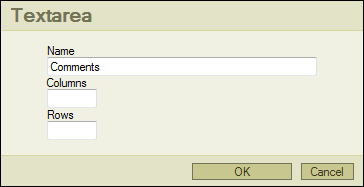
The Text Area control is a multi-line text input control and is used to write text in the text-area. In a text-area you can write an unlimited number of characters. For example, you may want the user to enter any additional comments they have.
- Enter a label for your Text Area such as "Comments:"
- Place your cursor directly after your label and hit the Return key on your keyboard.
- Click the Text Area icon.
- FIELD NAME: Enter a descriptor for the Text Area as this is what appears in the email you receive once the form is submitted. For example: "Comments". The Field Name cannot include spaces or special characters. You can use underscores to represent spaces. For example: Additional_Comments.
- COLUMNS: Enter the number of columns you want your text area to have. This sets the width of your Text Area.
- ROWS: Enter the number of rows you want your Text Area to have. This sets the height of your Text Area. Typically, you will have fewer rows than columns.
- Click the OK button to continue or the Cancel button if you do not wish to continue adding a Text Area to your form.
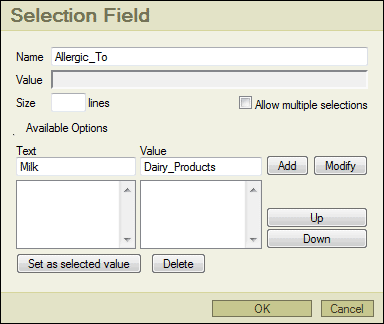
The Selection Field is used in the same manner as a Check Box and Radio Button, just presented differently to the user. If you have "Allow multiple selections" selected, the Selection Field will serve the same purpose as a Check Box. If "Allow multiple selections" is not selected, the Selection Field will serve the same purpose of a Radio Button.
- Enter a question that would require a Select Box for an answer. For example: "If so, what is your child allergic to?"
- Press the Return key on your keyboard.
- Click the Selection Field icon.
- NAME: Enter a descriptor for the Select Box as this is what appears in the email you receive once the form is submitted. For example: "Allergies". The Field Name cannot include spaces or special characters. You can use underscores to represent spaces. For example: Allergic_To.
- VALUE: The entry you set as the default selected value will appear here.
- SIZE: You can set the size of your select box, but you will lose the drop down list functionality if you set a size. So, we recommend that you leave this property set to zero.
- ALLOW MULTIPLE SELECTIONS: This will allow the user to select multiple choices from the Select Box by holding down the Shift key and clicking on each choice they want to select.
- TEXT: Enter the text you wish to appear in the Selection Field. For example, Milk.
- VALUE: Enter the value for the corresponding text entry. The value field cannot include spaces or special characters. You can use underscores to represent spaces. For example: Dairy_Products
- ADD: Click this button to add the selection to your Selection Field.
- MODIFY: Choose the selection you wish to edit and click the Modify button. Make your changes and click the Modify button to update your selection.
- REMOVE SELECTED: Click this button and to delete the selection shown in the Select Box window.
- Set As Select Value: Choose the selection you wish to set as your default value and then click the Set as selected value button. This text will selected by default on your form.
- DELETE: Choose a selection you want to remove and click the Delete button to remove it from your Selection Field.
- Click the OK button to continue or the Cancel button if you do not wish to continue adding a Selection Field to your form.

A form Button is used to trigger an event such as submitting the form, resetting the form or performing a script event.
- Click the Button icon.
- NAME: Enter a descriptor for the Button as this is what appears in the email you receive once the form is submitted. We recommend you leave this field name blank as you may not want it to show up in your email. The Field Name cannot include spaces or special characters. You can use underscores to represent spaces. For example: Submit_Button.
- TEXT (VALUE): This is what will appear on the button that is within your form.
- FIELD TYPE: You can add a Generic, Reset or Submit button to your form. The Generic Button button has no default behavior. A generic button may have client-side scripts that you create associated with the element's event attributes. When an event occurs (e.g., the user presses the button, releases it, etc.), the associated script is triggered. The Reset Button will clear the contents of the form. The Submit Button will submit the form and send it to the email address indicated when the form was created.
- Click the OK button to continue or the Cancel button if you do not wish to continue adding a Button to your form.
Note: Should you need to update the button type once it is added to your form, you will have to delete the current button and add a new one. If you just need to update the Name or Value, you can still do so by right-clicking the button.
Click the Save

icon in the upper right corner of your screen.
- Click inside the form box outlined in the editor.
- Click the form control within your form you wish to edit.
- Click the corresponding form control icon on the editor toolbar.
- Make the appropriate changes and click the OK button.
- Click the Save
 icon in the upper right corner of your screen.
If nothing happens when you click the Use System Processor button, follow the steps below to correct this problem:
- Click Tools on the browser menu.
- Select Internet Options.
- Click the Security tab.
- Click the Custom Level button.
- Scroll down to the bottom of the list.
- Where it says, "Allow websites to prompt for information using scripted windows", select Enable.
- Click OK.
- Click OK again.
- You might also have to refresh your browser view (F5 on your keyboard) in order for this to take effect, but be sure to save your page first.
 Check boxes are used when you want the user to select one or more options of a limited number of choices. For example, you may want to know if the user has a car, truck or both.
  Radio Buttons are used when you want the user to select one of a limited number of choices. For example, you may want to know if the user is male or female.
  Text fields are used when you want the user to type letters, numbers, etc. in a form. For example, you may want the user to enter his or her first and last name.
  The hidden field is a field that is not viewable to the user, but whose values are submitted with a form. The hidden field control type is generally used to store information between client/server exchanges that would otherwise be lost. This field can be used to define required input or to setup a return url.
  The Text Area control is a multi-line text input control and is used to write text in the text-area. In a text-area you can write an unlimited number of characters. For example, you may want the user to enter any additional comments they have.
 The Selection Field is used in the same manner as a Check Box and Radio Button, just presented differently to the user. If you have "Allow multiple selections" selected, the Selection Field will serve the same purpose as a Check Box. If "Allow multiple selections" is not selected, the Selection Field will serve the same purpose of a Radio Button.
 A form Button is used to trigger an event such as submitting the form, resetting the form or performing a script event.
 Delete the "Under Construction" text and replace it with appropriate text to best meet your form needs.