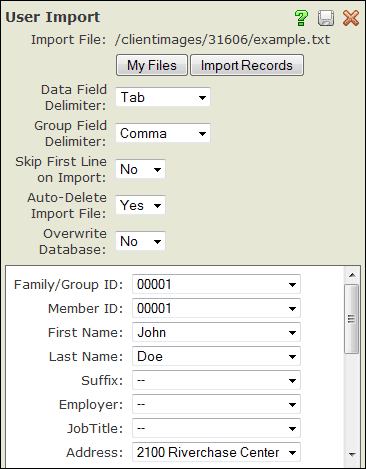
- Delimiter: Tab, comma, Blank space or other character or symbol that indicates the beginning or end of a character string, word or data item in a text file, database or source code, for example.
- Your import file can be uploaded to any location within your My Files section.
- Your import file must be of file type .txt or .csv.
- Family ID: Unique id from your database representing the person's family.
- Member ID: Unique id from your database that represents the individual. (Although not required, we do recommend importing a Member ID into the People Manager.)
- First Name: The person's first name.
- Last Name: The person's last name. (Required)
- Suffix: The person's suffix such as Jr. or Sr.
- Employer: The person's employer.
- Job Title: The person's job title.
- Address: The first line of the person's street address.
- Address 2: The second line of the person's street address.
- City: The city where the person lives.
- State/Province: The two-letter postal code for the state/province where the person lives.
- Country: The country where the person lives.
- Postal Code: The postal code for the location where the person lives.
- Birthday: The person's birthday in (mm/dd/yyyy) format.
- Home Phone: The person's home phone number.
- Work Phone: The person's work phone number.
- Mobile Phone: The person's mobile phone number.
- Email Address: The person's email address.
- Email Address 2: An alternate email address for the person.
- Fax: A fax number for the person.
- Website: A website address for the person.
- Groups: a delimited list of group codes from your database for groups to which this person is related.

To set your import preferences and import your people, select the "Import Data" tab in the
People manager.
- MY FILES: Select the My Files button to choose your import file location.
- IMPORT RECORDS: When you have selected the appropriate settings for your import, select the "Save" button in the upper right corner of the dialog box. Select the "Import Records" button to import your people into the People manager.
- DATA FIELD DELIMITER: Select the delimiter (character separator) for your data fields. Tab is the default setting. Your data field delimiter must be different than your group field delimiter.
- GROUP FIELD DELIMITER: Select the delimiter (character separator) for your group field. Comma is the default setting. If you wish to assign imported users to specific groups, you will need to create the groups you wish to use from your database in the Groups manager and assign each group's "External ID" field a corresponding unique group id from your database. Your group field delimiter must be different than your data field delimiter.
- SKIP FIRST LINE ON IMPORT: Typically, the first line of your import file will contain Field Names. The import will NOT work with Field Names included. Select "YES" to skip the first line in your import file. Select "NO" to import all lines in your file, including the first line.
- AUTO-DELETE IMPORT FILE: Select "YES" to delete your import file from the My Files section of your site. The deletion will occur once the import process is complete. Select "NO" to leave your import file in place in the My Files section of your site.
- OVERWRITE DATABASE: Select "YES" to overwrite records in your People manager. Should an existing record differ from the information in your import file, the system will update the record with the differing information during the import process. Select "NO" to keep all existing records the same.
Matching Fields
Use the drop-down menus to match your fields to the fields within the
People manager. For example, First Name to the person's First Name or Address to the person's Address, etc. Click the Save icon in the upper right corner of the dialog box once you match the fields. You only have to match fields for the first record in your file and the system will match up the rest of the records in the same manner when you click the Import Records button.
 To set your import preferences and import your people, select the "Import Data" tab in the People manager.